
An effective way to fix hard disk partitions creates or delete them in Windows OS. For this purpose we try to details showed here – How to Create & Delete a Partition in Windows 7 without any Data Loss. You can easily do it. Most of the time we need new windows installed for various purposes. I think this post is constructive for you and anyone who efficiently used the partition on their personal computer. We usually know windows are installed with a single partition on your hard disk drive. If you need a different partition and you can spill your hard drive into several barriers. You can store your files and data separately from your system files.
We usually need to format our hard drive when creating any partition. If we create some different barrier correctly to use our hard drive, we shall lose our essential data or files. But here I will show you how to create a partition in windows seven easily without losing your valuable data. This system will finish some steps, and you must follow the action if you don’t forget your data or files. Creating a partition can be more suitable when you install windows or its upgrade. Now I show you an effortless way to the new partition in Windows 7. You can make a partition without hesitation.
How to Create a Partition in Windows 7, 8, 10?
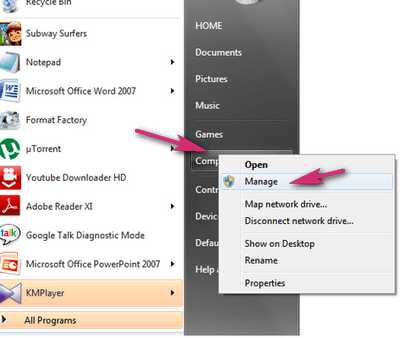
Step 1: At first click on the start menu and place your cursor on the computer button, the right button click. You will see another list open then click on the manage option.
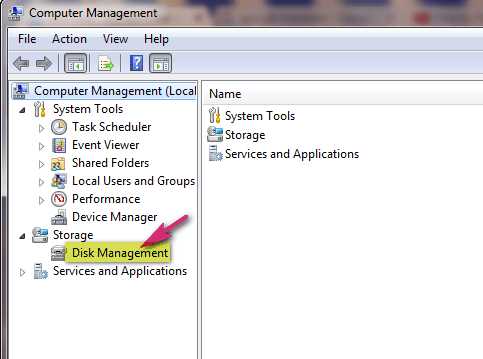
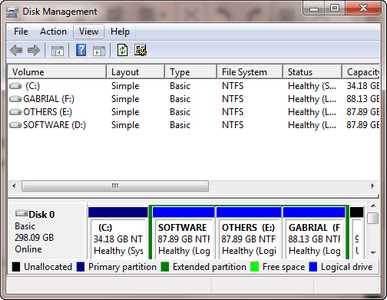
Step 2: When you click on the manage option; you will see a new window open. Just select to click on Disk Management then click on Storage Category.
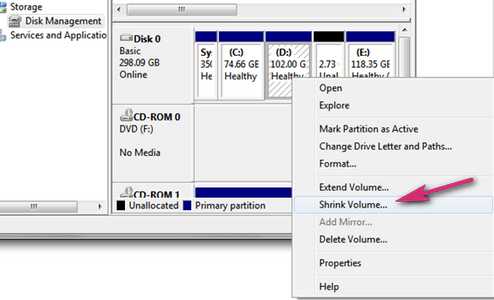
Step 3: When you will see a window when you select your favorite drive and the right button click. If, you want to shrink to create a partition, just select Shrink Volume.
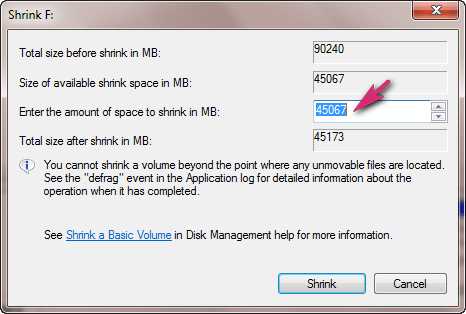
Step 4: Now you will see a new window open where you know the size of the drive to available space for the shrink. Just enter the amount of space you want to shrink. When you select the amount of space, then click on the Shrink button.
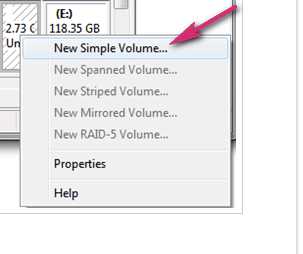
Step 5: After a while, unallocated drive in your computer management window. Just click on the right button in your mouse on an unallocated drive. Then select a new simple volume.
Step-6: Once will appear a new volume wizard. Then click on next about three times. At last, you will see the format partition window. Now you should make sure the file system is NTFS and also check to perform a quick format. Finally, click on next and you have done.

Now you are clear about, how to create a partition in Windows 7 without data loss. It’s the very most comfortable way of installing or setting up your Windows 7 without losing valuable data.
How to Delete a Partition in Windows 7, 8, 10?
We usually face many problems when we remove a barrier. If we don’t clear on how to delete a partition in Windows 7, we don’t cancel a partition easily. Now you can delete a partition on the hard disk drive in Windows 7. If you think that separation is no more useful, you can delete the partition. So, you need to double-check your data; otherwise, your important, valuable data will lose when you delete any partition if you have any necessary documents and should keep this document file safe.
You can easily your significant data transfer to another folder and then delete a partition. We know disk management tool is beneficial for deleting a partition in Windows 7. You can use this tool for creating, shrinking, and extending the partition. When you know how to delete a partition in Windows 7 quickly, you don’t need a computer expert to help.
Firstly press the Windows key for an open start menu. Next, paste (diskmgmt.msc) or Create and Format Hard Disk Partition in the search bar and press Enter. When you enter, then you will see a new Window pic below.
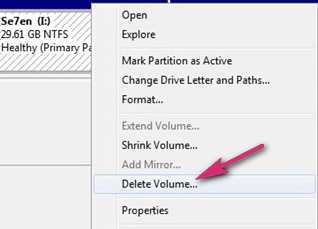
Which partition do you want to delete and right-click on the partition? When you right-click on the partition, you will see various options, and just select delete volume.
Then you will see a message then click on the Yes button to continue. Your partition has been deleted successfully. Now you can extend the volume. Suppose you extend amount E. Right-click on volume E and next select the Extend Volume.
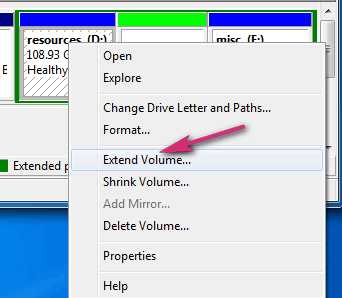
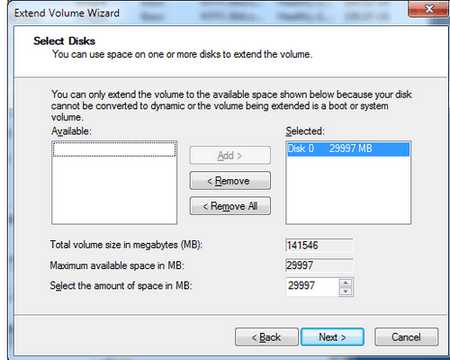
When you selected the extend volume you will see a new Window “Extend Volume Wizard” Pic below. Then click on Next to start the wizard, and you need to select where you want to extend the current volume. Finally, click on Finish and you have done it successfully.
Now I hope you are clear about how to create & delete a partition in Windows 7, 8, or 10. All the processes as the same using other Windows OS. If you know, this article is very helpful for Windows Users, never miss to share it with others. If you have any questions or information comment below.
Also, Check – How to Use Pendrive as RAM in Windows 10 [2 Effective Ways]